My eInk Departure Board
This is a short learning journey to build my own eInk National Rail Departure Board.
The Background
I am a British rail enthusiast and I love collecting railway-related items. One of the top items on my wish list is the UK Departure Board, which is a beautifully designed product that closely resembles the real thing.
Unfortunately, the steep price tag makes it difficult for me to justify purchasing one anytime soon. However, I believe that if they can make one, we can make a similar one too!
The Idea
Rather than trying to replicate the UK Departure Board exactly, I’ve decided to take a different approach. My idea is to build an e-ink version of the board, similar to the bus stop arrival board. My objectives are to create a display that is:
- Cheap
- Easy to deploy
- Resembles the information shown on my local station’s departure board
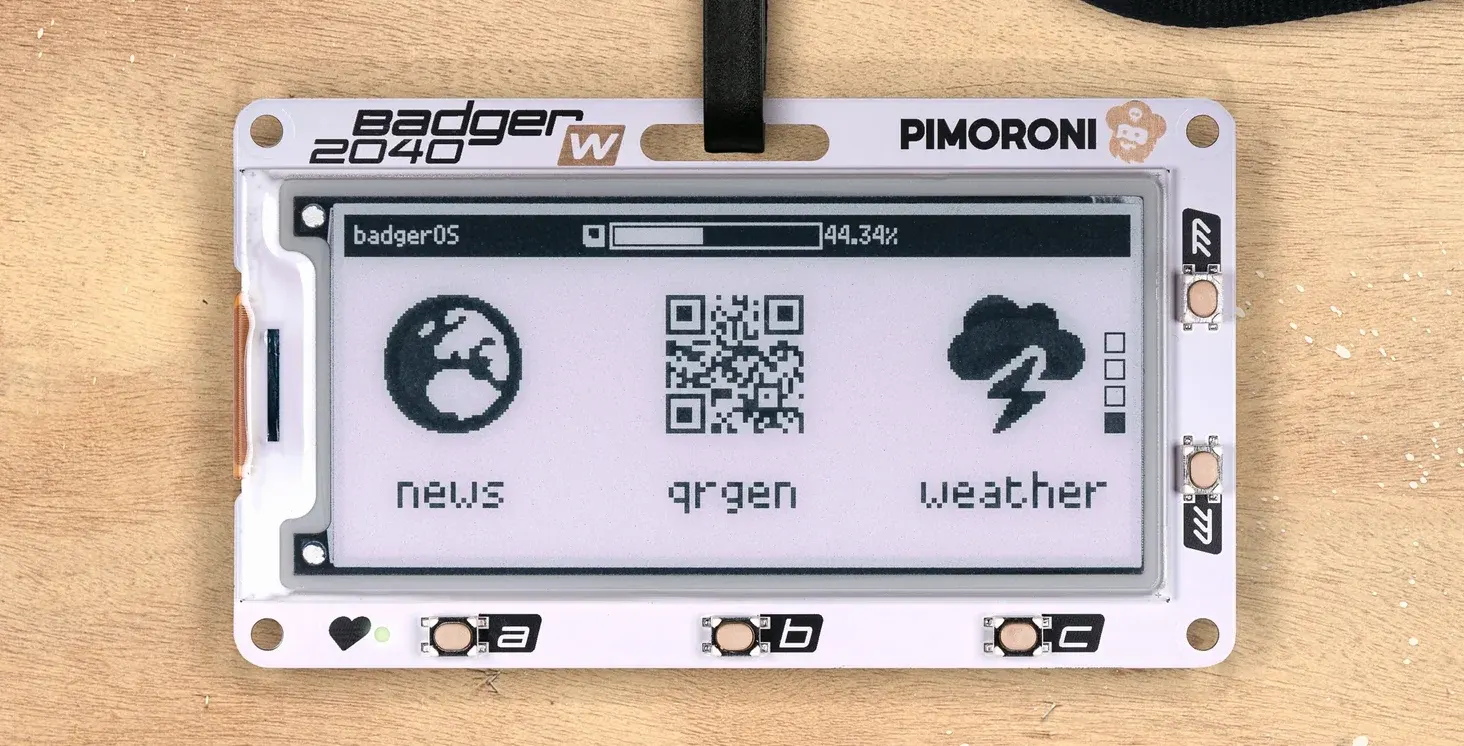
Pimoroni Badger 2040W
To create the display, I’ll be using the Badger 2040 W. Although I originally purchased it as a name badge, it’s the perfect tool for this project because:
- It is highly programmable and hackable, allowing me to run micropython code and make modifications as needed
- It has low power usage, which is important for a display that will be running continuously
- It’s affordable
- I was able to purchase it for only 25 quid
- It supports Wi-Fi and battery pack usage, giving me the flexibility to run it wirelessly - Unlike the Raspberry Pi, it has a real-time clock (RTC)
- It’s made in the UK, so I’m supporting the local economy
The Plan
Although the look and feel of departure boards in the UK are similar due to the same API being used, there are many different variations in the format. I’ll be choosing the format used in my local station and tweaking it to be useful for my purposes.
To collect the data, I’ll be using the official National Rail Enquiry DARWIN API (OpenLDBWS). This is a SOAP API that can be registered on the National Rail website. I’ll be using the GetDepBoardWithDetails query to get all the information. You can see a sample response in XML format from Openraildata wiki.
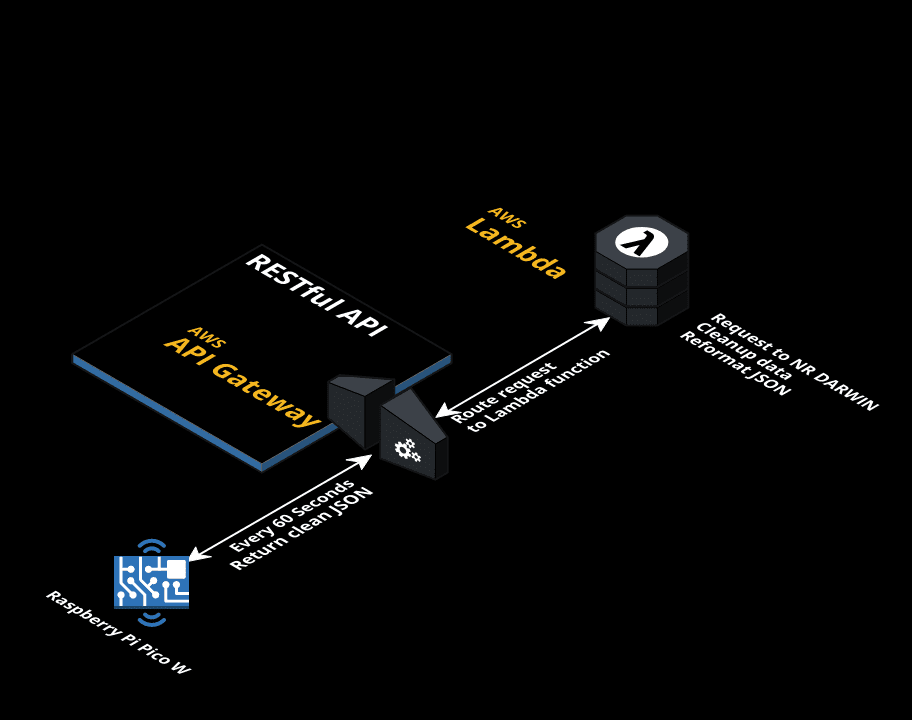
The data provided by the API is very intensive, but I only need certain information - for example, the calling point for the first train. To avoid overloading the Badger 2040W, I’ll be using middleware as a proxy to do requests to the API, process and minimize the data, and recompile it into a cleaner JSON format for the display to show.
I’ll be using AWS Lambda to do the simple processing, and API Gateway to serve as the API Endpoint and trigger.
Here’s a diagram of the setup:
Running Cost
In larger applications, the serverless framework might not be cheaper than firing up VMs. However, I’m choosing to use it for this project because I’m paying for high availability and saving time on infrastructure maintenance.
In addition, it’s more cost-effective than firing up a VM in this case. AWS Lambda offers a million free requests under their free tier. I’ll only need 43,200 requests (assuming one request every minute for 30 days), so I’m definitely under the limit. I’ll also only need the lowest RAM for the runtime (128MB).
API Gateway only offers a free tier for the first 12 months, but even after my free tier has expired, it will only cost 0.15 USD (0.12 GBP) per month. This is much cheaper than using a Lightsail VM, which costs 3.5 USD per month. You can find the cost estimation I created on AWS pricing calculator.
Getting the Data
Once registered, the API key will be sent to your email. OpenRailData has a very simple and easy-to-understand Python example that uses Zeep to create the SOAP request. I’ll be using this as the base to collect my rail data.
Here’s the code to run on AWS Lambda, which I’ve modified based on the example provided:
import json
import zeep
import os
from zeep import Client, Settings, xsd
from zeep.plugins import HistoryPlugin

#API Keys and Endpoint
LDB_TOKEN = os.environ['LDB_TOKEN']
WSDL = os.environ['WSDL']

# Error Handling
if LDB_TOKEN == '':
    raise Exception("Token Not Set")

def lambda_handler(event, context):
    settings = Settings(strict=False)
    history = HistoryPlugin()
    client = Client(wsdl=WSDL, settings=settings, plugins=[history])
    header = xsd.Element(
        '{http://thalesgroup.com/RTTI/2013-11-28/Token/types}AccessToken',
        xsd.ComplexType([
            xsd.Element(
                '{http://thalesgroup.com/RTTI/2013-11-28/Token/types}TokenValue',
                xsd.String()),
        ])
    )
    header_value = header(TokenValue=LDB_TOKEN)
    res = client.service.GetDepBoardWithDetails(numRows=2, crs=os.environ['crs'], _soapheaders=[header_value])
    current_station = res.locationName
    services = res.trainServices.service

    # Call important data from JSON
    i = 0
    t = services[0]
    t2 = services[1]
    train_time = t.std
    train_dest = t.destination.location[0].locationName
    train_plat = t.platform
    train_carriages = str(t.length)
    train_status = t.etd
    calling_points =t.subsequentCallingPoints.callingPointList[0].callingPoint
    train_time2 = t2.std
    train_dest2 = t2.destination.location[0].locationName
    train_plat2 = t2.platform

    callpoint_text = ""

    while i < len(calling_points):
        cp = calling_points[i]
        if i < len(calling_points) - 1:
            print(str(cp.locationName) + ", " , end="")
            callpoint_text += str(cp.locationName) + ", "
        else:
            print(str(cp.locationName) + "." )
            callpoint_text += str(cp.locationName) + "."
        i += 1

    # Creating own JSON
    raildata_dict = {
        'station' : current_station,
        'time' : train_time,
        'dest' : train_dest,
        'plat' : train_plat,
        'carriage' : train_carriages,
        'status' : train_status,
        'callingat' : callpoint_text[:26],
        'time2' :  train_time2,
        'dest2' : train_dest2[:16],
        'plat2' : train_plat2
    }

    raildata_json = json.dumps(raildata_dict)

    return {
        'statusCode': 200,
        'body': json.dumps(raildata_dict)
    }
You can use environment on Lambda too, it is encrypted at rest so your API Keys are safe.
It might not be the prettiest, but it’s perfect for a quick prototype. Here’s what the code accomplishes:
- Sends a SOAP request to the NRE API.
- Zeep translates the XML response into JSON.
- Extracts the necessary variables (time, destination, calling points, service status, and platform).
- Rewrites and returns the JSON.
Now, let’s deploy it to Lambda!
Setting up Lambda
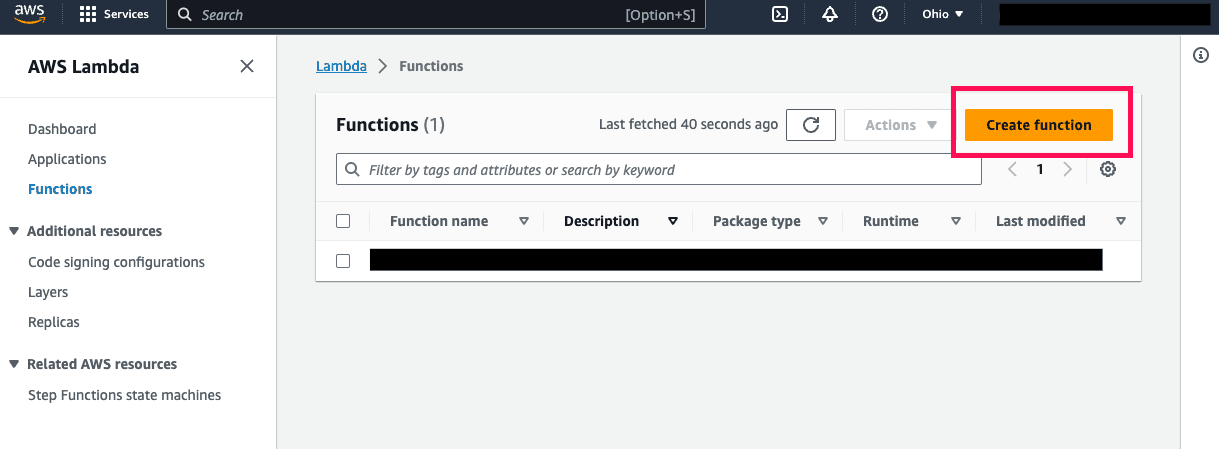
Head over to the AWS Management Console, navigate to Lambda, and click “Create function”.
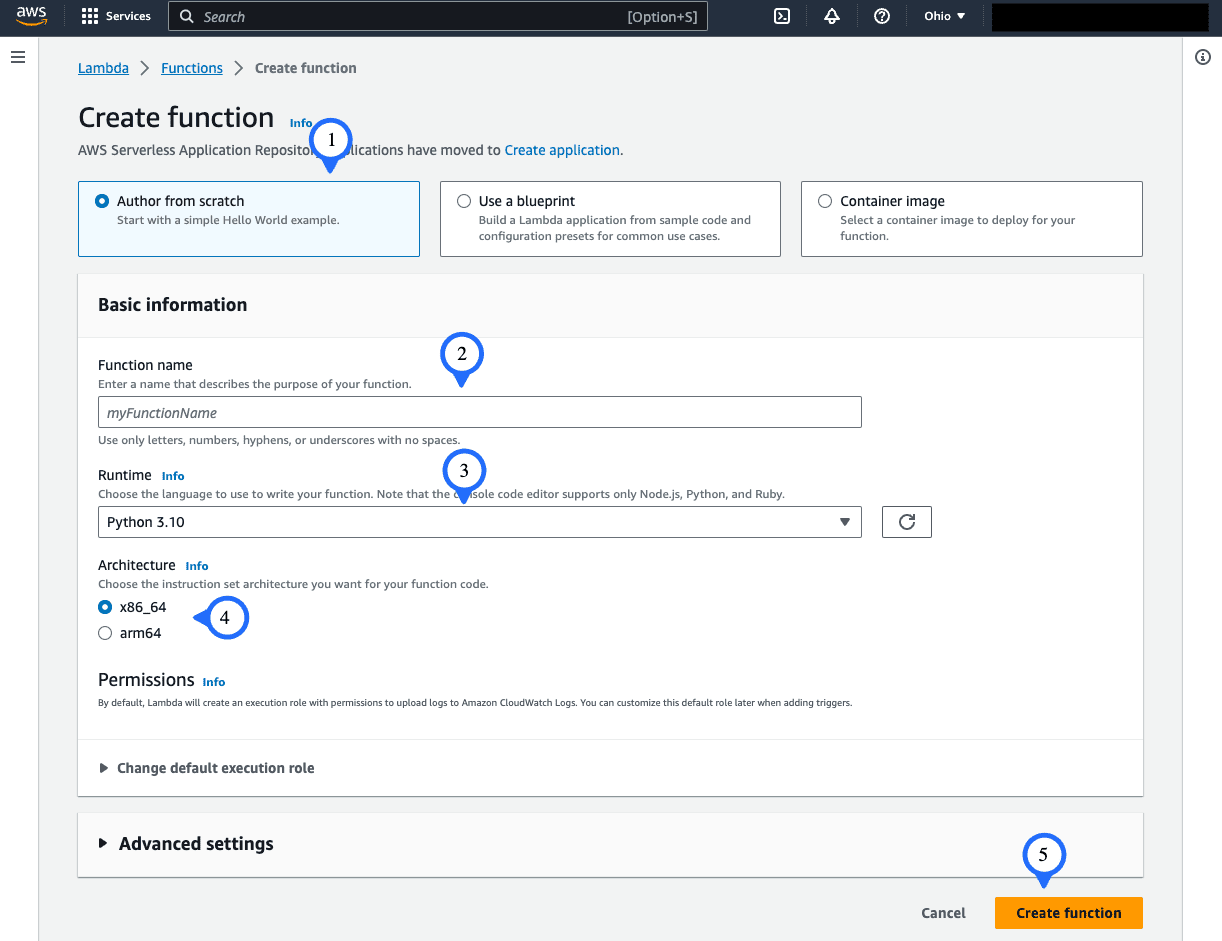
Opt for “Author from scratch” and name the function whatever you fancy. For the runtime, we’ll be using Python 3.10.
For architecture, let’s stick with x86_64. (I haven’t ventured into arm64 for this project, but I reckon it should work given the libraries I’ve used are arm64 compatible.)
You can leave the other settings as they are.
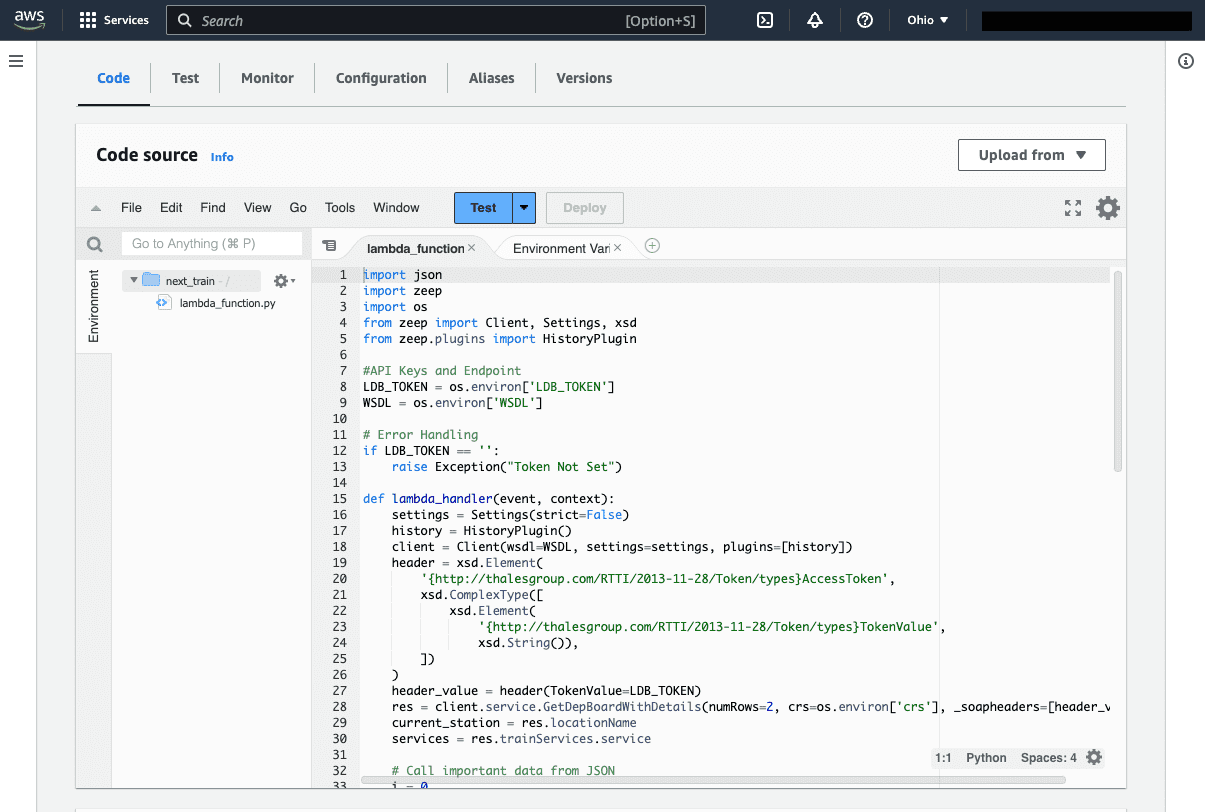
Paste the code provided above into the Lambda IDE, deploy it, and give it a test. Oops! It fails.
The hiccup? Lambda can’t locate the library. To resolve this, we’ll need to package it up. First, use pip to install it in a specific directory.
pip install --upgrade --only-binary=:all: --platform manylinux2014_x86_64 zeep -t .
Then, zip it up.
On the Lambda function page, click on the hamburger menu in the top left corner and select “Layers” under Additional Resources.
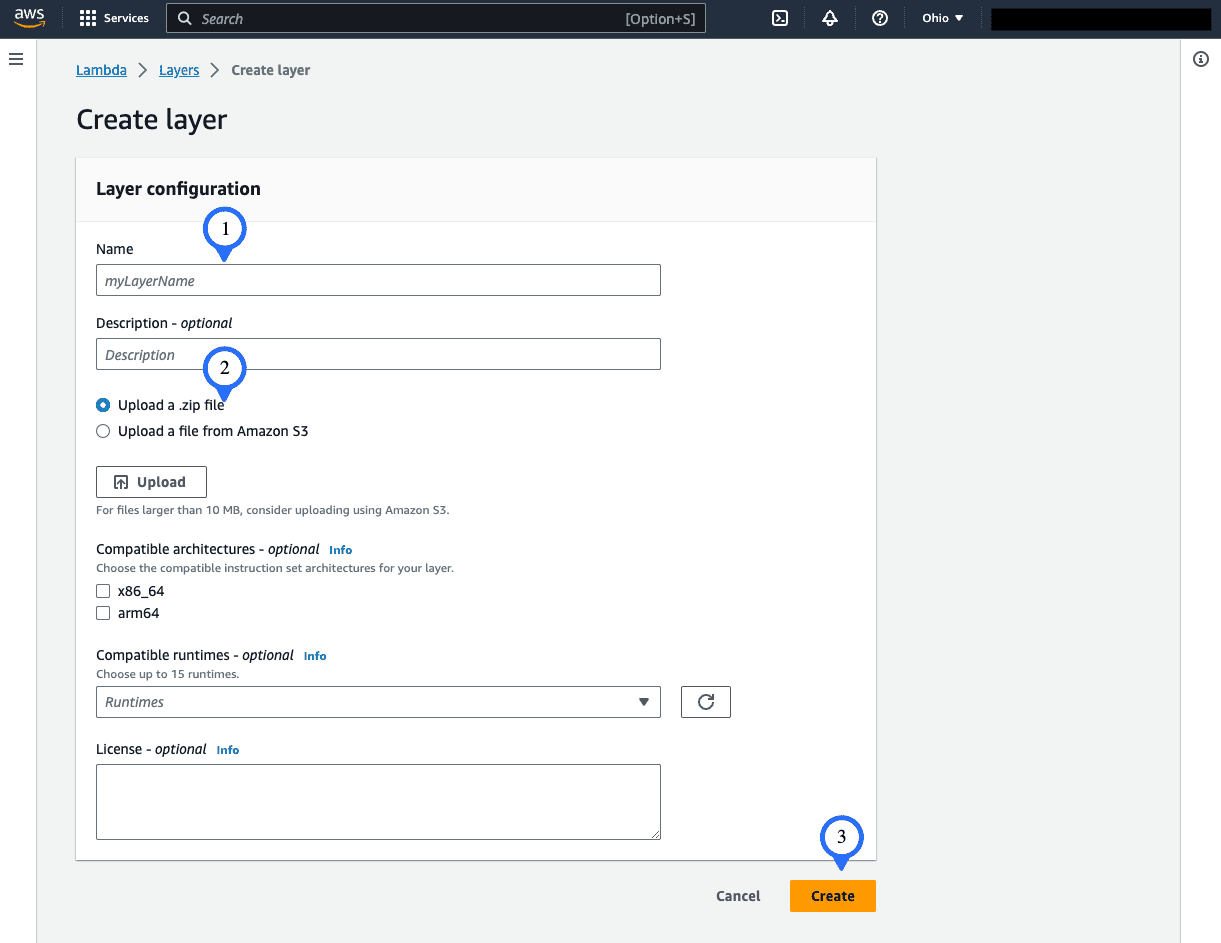
Click “Create layer”, name it, upload the zip file, and ensure you select the same architecture (x84_64). Click “Create”.
Head back to the function page and add the layer.
Click “Add a layer”, choose AWS layers, and select the layer you just added from the dropdown list.
Test it again, and voilà! You should see a JSON in the response.
Setting up the API Gateway
Next, we need a trigger for our Lambda function and an endpoint to serve the JSON response. Enter the API Gateway.
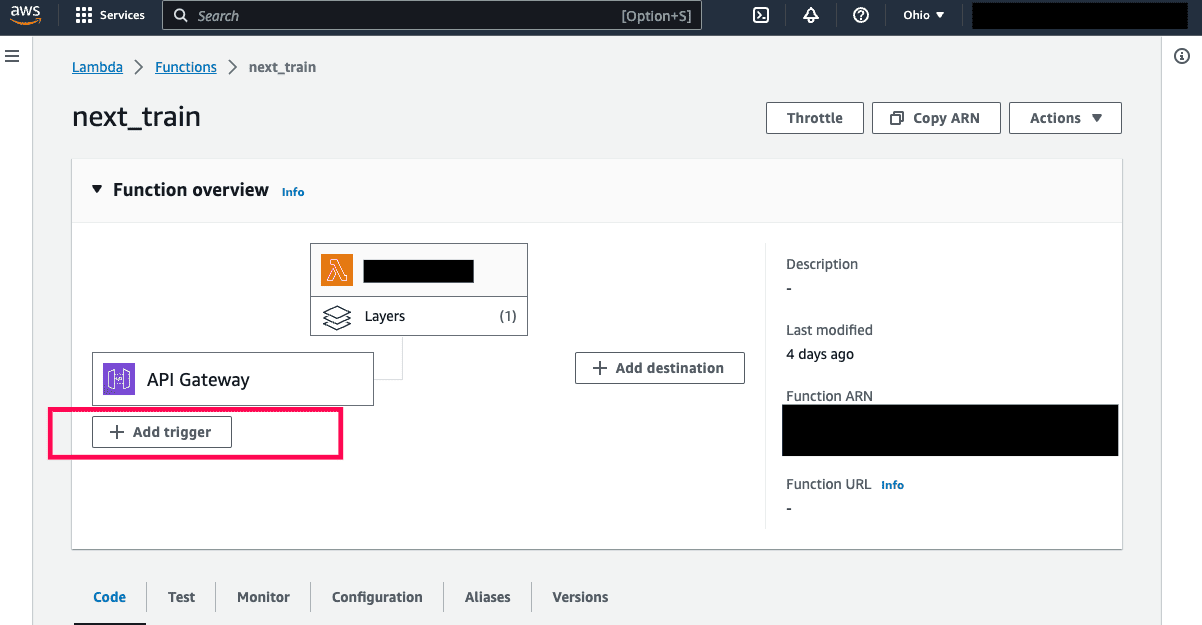
You can set up the API Gateway directly from the function page. On the diagram, click “Add trigger” and select API Gateway in the Trigger configuration.
Opt for a REST(ful)API to handle the request. To safeguard against potential attacks on our API Endpoint (and avoid any unexpected bills!), we’ll secure it with an API key.
I’ve also set a low throttle rate, given we’re only making one request per minute. This adds an extra layer of protection to the endpoint.
Always set up usage alerts in AWS. This way, you'll be notified of any unusual activity.
With the endpoint and API key in hand, we can now focus on the Pico W.
Setting up the Pico W
I’d never dabbled with a microcontroller before, but thankfully, Pimoroni offers a comprehensive and user-friendly guide. Hats off to them!
Our task now is to write the code to request data from the API we’ve just set up. With Lambda handling the heavy lifting, this part is a breeze. Here’s the code:
import badger2040
from badger2040 import WIDTH
import time
import ntptime
import urequests
import ujson

# Setup display
badger = badger2040.Badger2040()

# Connect to wifi
badger.connect()
# Set the NTP server to sync with
ntptime.host = "time.cloudflare.com"

# Sync the RTC with the NTP server
ntptime.settime()

# Test Wifi Status & Show Screen Size
print(badger2040.is_wireless)
print("Screen size:" + str(badger.get_bounds()))
WIDTH, HEIGHT = badger.get_bounds()

# Set the LED brightness (0-255)
badger.led(1)

# API to AWS API Gateway
url = "API Gateway location"

def display_refresh():

    # Get the current time as a tuple
    tn = time.localtime()

    # Define a function to format the time as HH:MM
    def format_time(tn):
        print(tn)
        return "{:02d}/{:02d}/{:02d} {:02d}:{:02d}".format(tn[2], tn[1], tn[0], tn[3]+1, tn[4])

    print("local time",tn)
    # Format the time as a string
    ft = format_time(tn)

    # Get Data from AWS Lambda via API Gateway, the API Key are enclosed here
    res = urequests.request('POST', url, data=None, json=None, headers={ 'x-api-key': 'KEY HERE' })

    input = ujson.loads(res.text)
    print(input)

    # Write text, pen 0 = black and 15 is white
    badger.set_pen(0)
    badger.clear()
    badger.set_pen(15)
    badger.set_font("bitmap8")

    # Scale 2 can fit 28 chars
    # Line1 and divider
    badger.text(input["time"], 8, 5 , scale=2)
    # If trains is cancelled, there is no platform information.
    if input["plat"] is not None:
        badger.text(input["plat"], 60, 5 , scale=2)
    badger.text(input["dest"], 75, 5 , scale=2)
    badger.line(5, 24, 291, 24, 2)

    #Line 2
    # If trains is cancelled, there is no calling stops information.
    if input["plat"] is not None:
        badger.text("Calling at:", 8, 30 , scale=2)
    badger.text(input["status"] , 226, 30 , scale=2)
    #Line 3
    badger.text(input["callingat"] + ".."  , 8, 46 , scale=2)
    #Line 4
    badger.text("This train has " + input["carriage"] + " carriages.", 8, 62 , scale=2)
    #Line 5
    badger.text("", 8, 78 , scale=2)
    #Line 6
    badger.text("2nd " + input["time2"] + "   " + input['plat2'] + "  " + input["dest2"]  , 8, 94 , scale=2)
    #Line 7
    badger.text("Time now : " + ft , 8, 110 , scale=2)
    badger.update()


# Loop forever
while True:
    # Display the time every second
    display_refresh()
    time.sleep(60)
This code will:
- Fetch the JSON from AWS API Gateway/Lambda.
- Print the string.
- Call the NTP server for the time (making the most of the RTC in Pico W).
- Display the time.
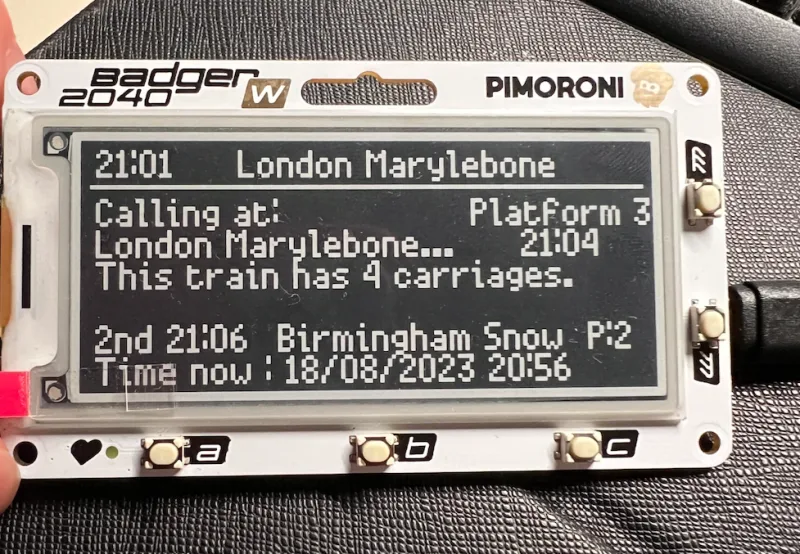
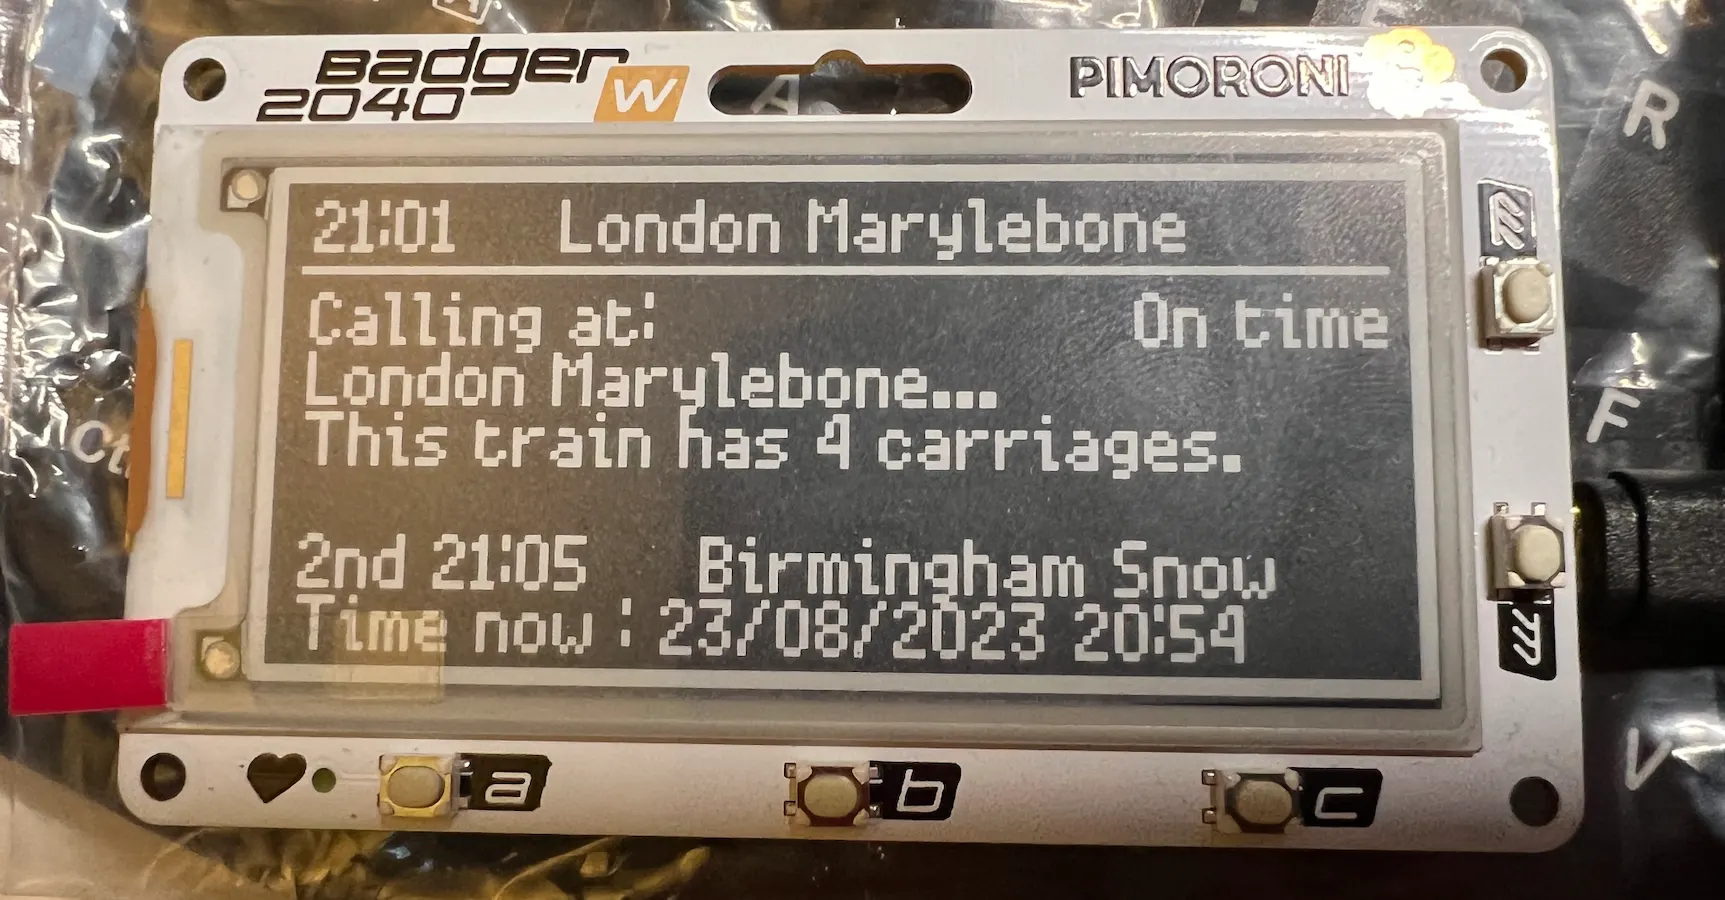
This is the final result:
Achievements and Compromises
We now have a basic prototype of the departure board. Due to the E-ink’s nature, I couldn’t incorporate fancy animations like the rolling calling points seen in dot matrix displays.
The screen size also limits the amount of information displayed. I’ve truncated some text to achieve the desired effect.
Reflections
Currently, the Badger lacks an internal word wrap function, which is crucial for displaying the calling points correctly. I’ll need to delve deeper into this, but I’m genuinely enjoying the process. So, stay tuned!
What’s on the Horizon?
I’m toying with the idea of purchasing a colour e-ink display, perhaps a larger one that can display more information. Maybe even transform it into a smart display! However, that’s a project for after my driving exam. I’m also eager to create a bus arrival board displaying local bus stop information. I’m just waiting for Traveline to grant me access. Until then, that’s all from me. Have a splendid day!
